Welcome to PirateLearner Blogging App
A Simple Blogging App that enables you to:
- Create/Decide Layout of the post.
- Arrange them in hierarchy.
- Write taggable blog articles.
Apart from these stand-alone features this app can be used as Django-CMS app where it can provide various plugins like:
- Latest Entries Plugin (with Various view options).
- Section Views Plugin.
- Contact Page Plugin.
- Filtering Entries based of Tags.
Requirements
- Python - 2.7.
- Django - 1.5.x or 1.6.x.
- Reversion - 1.7.x or 1.8.x.
- Taggit - latest version.
- Ckeditor- 4.x.
- Crispy Forms - latest version.
- mptt - (0, 6, 1).
- django_select2
Installation
Use pip for installing the app:
pip install pi-blogging --pre
(Note that it is in beta version right now)
or download zip file from github - here
after installation, add blogging to your installed apps and also make sure that requirements are also installed -
INSTALLED_APPS = (
...
'reversion',
'crispy_forms',
'blogging',
'taggit',
'ckeditor',
'django_select2',
...
)
Also add blogging urls in your projects urls.py -
urlpatterns = i18n_patterns('',
...
url(r'^', include('blogging.urls',namespace='blogging')),
...
)
after this just run python manage.py syncdb for creation of database tables.
Usage
Basic Usage of the Blogging App is creating blog entries and navigate among them. App has three core entities :
- Content Type.
- Blog Parent.
- Blog Entries.
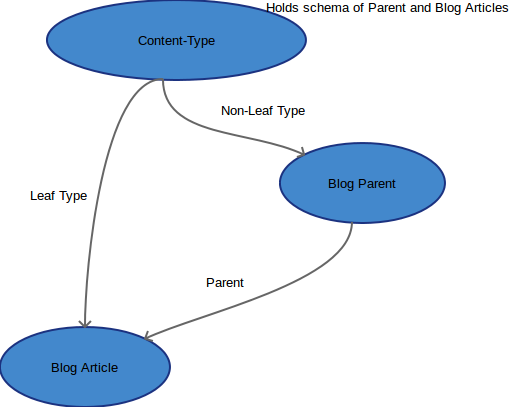
These three entities have the following relationship -

Content-Type can be of Non-Leaf(for Parent) or Leaf (Content) type and is necessary for creating Parent or Blog entries. Once Content-Type is created, a hierarchy can be generated by creating various Parents. Blog entires must have one Content-Type (Leaf) and one Parent(Non-leaf).
Workflow for creating Blog entries comprises of three steps:-
At this point, I would like to encourage you to download the source from github alongwith its demo, and try out the demo for more clarity
Create Content-Type
Content Type defines the Basic layout of the Article or its Parent.
URL for creating the Content-Type is {base_url}/content-type/, where base_url is the name given in urls.py.
This url is the first step in the creation of Blog entries. Just click on the + hyperlink and a new window
will pop-up where you can create the Content-Type.
please note that names cannot have space or special character as of now and Title fields is already include so do not add that in the fields area
Create Blog Parent
Blog Parents are the 'non-leaf' type of entities. To create one, you will first need at least one
content-type of non-leaf kind.
The behaviour has been made such so that the user can also associate content with parents.
For example, if we are creating a book, then we want to be able to not just write content in chapters,
but also design cover pages to our liking, or perhaps, write synopsis to the chapters there.
Creation of parent nodes is similar to that of content nodes, and you can select a parent to the newly
created parent or section. This is just like associating a chapter to a book, or a section to a chapter
(where all of them are titles).
I encourage you to put some descriptive image in the description field, as the app will parse the body to fin dif any image link is there, and if found, it will use it as thumbnail.
Make sure that a Non-Leaf Content-Type is selected in Content-Type while creating the Parent
Create Blog Entries
Blog entries can be easily created from the front-end. First step is selecting the content-type and url is {base_url}/content-type/, click on the next button and then you
will have the layout as were selected while creating Content-Type.
P.S. I understand the terminology is a little ambiguous right now, for a little headsup, to create
presentational content, click on the buttons and to create schemas, click on the + button.